


Overview
The Arduino GIGA R1 WiFi is designed for ambitious makers who want to step up their game. It levels the playing field for gamers, artists, sound designers and anyone coming to the tech world with big ideas on a budget – because it packs advanced features into an accessible component, with the same form factor as our popular Mega and Due.
Let’s break down all the powerful features of this board.
Microcontroller (STM32H747XI): This dual core 32-bits microcontroller allows you have two brain talking to each other (a Cortex®-M7 at 480 MHz and a Cortex®-M4 at 240 MHz) you can even run micropython in one and Arduino in the other.
Wireless communication (Murata 1DX): Whether you prefer Wi-Fi® or Bluetooth®, the GIGA R1 WiFi got you covered. You can even quickly connect to the Arduino IoT Cloud and keep track of your project remotely. And if you are concerned about the security of the communication, the ATECC608A keeps everything under control.
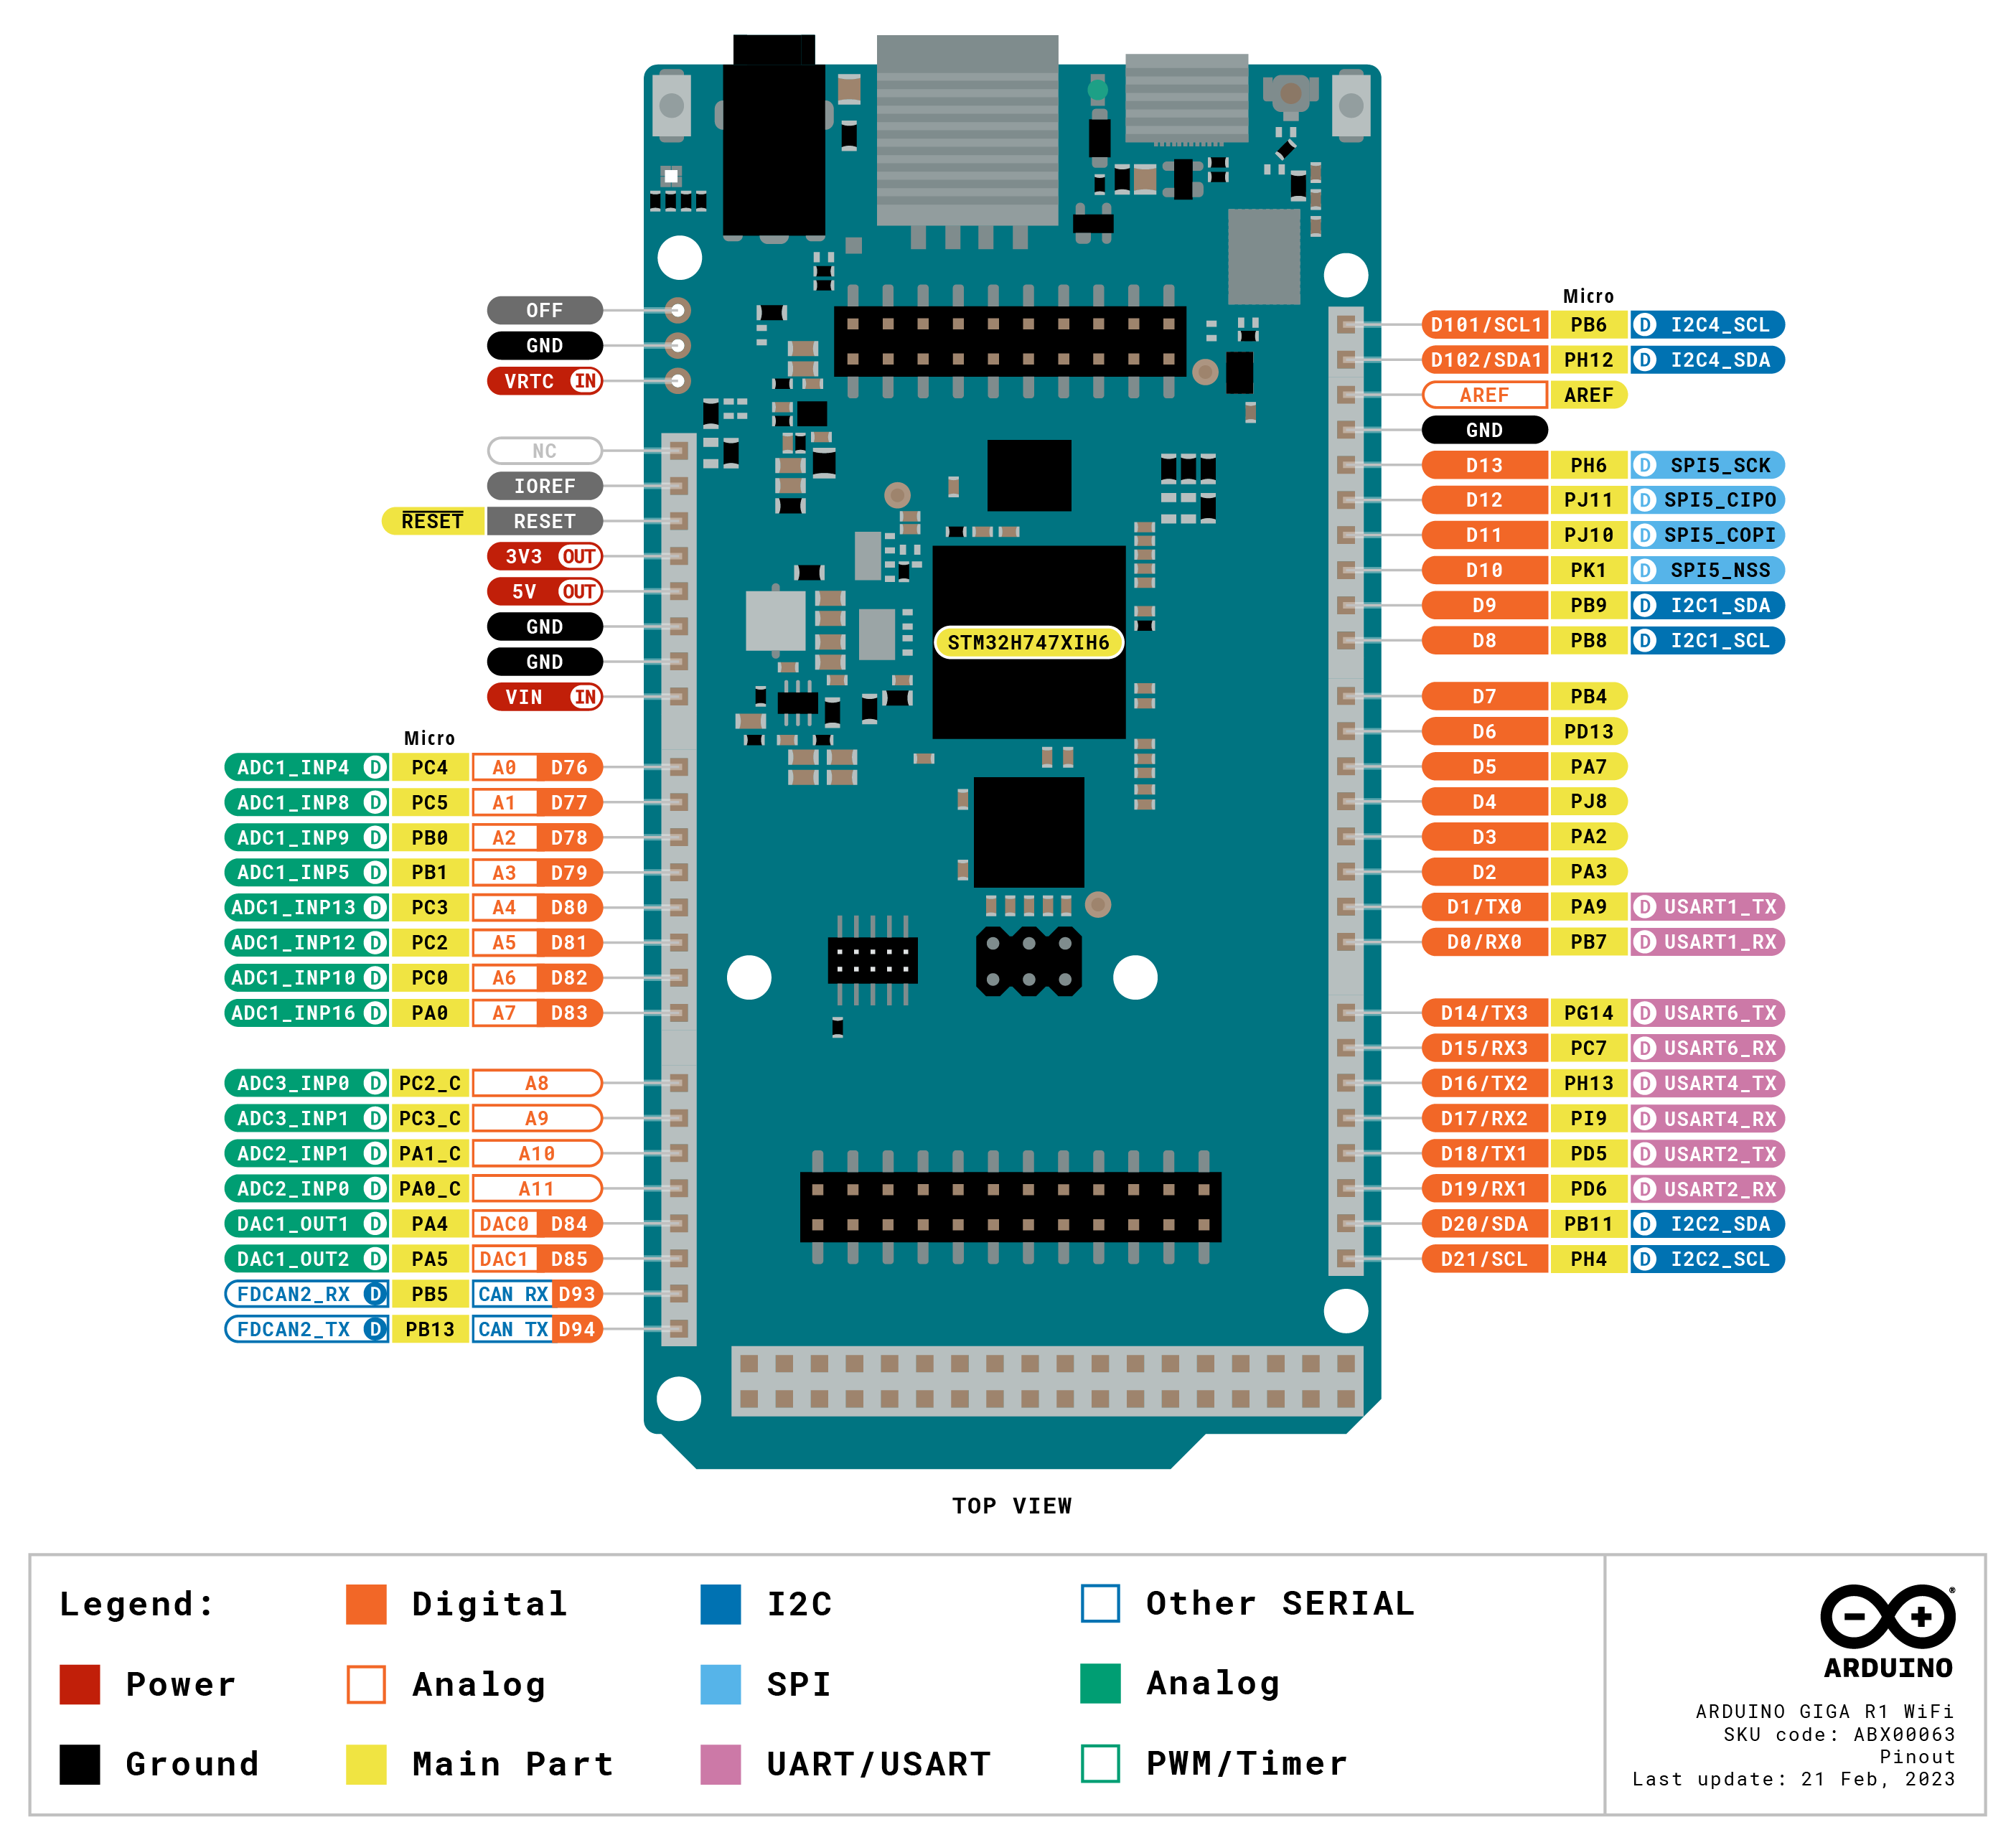
Hardware ports and communication: Following the legacy of the Arduino Mega and the Arduino Due, the GIGA R1 WiFi has 4 UARTs (hardware serial ports), 3 I2C ports (1 more than its predecessors), 2 SPI ports (1 more than its predecessors), 1 FDCAN.
GPIOs and extra pins: We wanted to keep the same form factor of the Mega and the Due, so you can easily adapt your custom made shields to the GIGA R1 WiFi (remember this board works at 3.3V though!) and we added extra headers to access extra pins, leaving the total count to 76 GPIO pins, and the best part, you can access them from underneath, so keep your project as it is and just think on how to expand it. Also, we added two new pins: a VRTC so you can connect a battery to keep the RTC running while the board is off and an OFF pin so you can shut down the board.
Connectors: The GIGA R1 WiFi has extra connectors on board which will facilitate the creation of your project without any extra hardware. This board has:
- USB-A connector suitable for hosting USB sticks, other mass storage devices and HID devices such as keyboard or mouse.
- 3.5mm input-output jack connected to DAC0, DAC1 and A7.
- USB-C® to power and program the board, as well as simulate an HID device such as mouse or keyboard.
- Jtag connector, 2x5 1.27mm.
- 20 pin Arducam camera connector.
Higher voltage support: In comparison with its predecessors that support up to 12 volts, the GIGA R1 WiFi can handle a range of 6 to 24 volts.
Arduino IoT Cloud Compatible

Use your MKR board on Arduino's IoT Cloud, a simple and fast way to ensure secure communication for all of your connected Things.
TRY THE ARDUINO IOT CLOUD FOR FREE
The Arduino GIGA R1 WiFi is definitely the best board for ambitious makers with bigger ideas. Connect it to the Arduino GIGA Display Shield and tap into the full potential of your next project with a 3.97” 480x800 RGB touch screen, including a digital microphone, a 6-axis IMU and an Arducam® connector
 Unlock your inner innovator and craft a unique shield for your GIGA WiFi R1 and GIGA Display Shield! With 3D printing, you can design a custom protection case tailored to your style. Check out our tutorial and get started on your DIY journey.
Tech Specs
| Board | Name | Arduino® GIGA R1 WiFi |
| SKU | ABX00063 | |
| Microcontroller | STM32H747XI dual Cortex®-M7+M4 32bit low power Arm® MCU (datasheet) | |
| Radio Module | Murata 1DX dual WiFi 802.11b/g/n 65 Mbps and Bluetooth® (datasheet) | |
| Secure Element | ATECC608A-MAHDA-T (datasheet) | |
| USB | USB-C® | Programming Port / HID |
| USB-A | Host (enable with PA_15) | |
| Pins | Digital I/O Pins | 76 |
| Analog input pins | 12 | |
| DAC | 2 (DAC0/DAC1) | |
| PWM pins | 12 | |
| Misc | VRT & OFF pin | |
| Communication | UART | Yes, 4x |
| I2C | Yes, 3x | |
| SPI | Yes, 2x | |
| CAN | Yes (Requires an external transceiver) | |
| Connectors | Camera | I2C + D54-D67 |
| Display | D1N, D0N, D1P, D0P, CKN, CKP + D68-D75 | |
| Audio Jack | DAC0, DAC1, A7 | |
| Power | Circuit operating voltage | 3.3V |
| Input voltage (VIN) | 6-24V | |
| DC Current per I/O Pin | 8 mA | |
| Clock Speed | Cortex® M7 | 480 MHz |
| Cortex® M4 | 240 MHz | |
| Memory | STM32H747XI | 2MB Flash, 1MB RAM |
| Dimensions | Width | 53 mm |
| Length | 101 mm | |
Conformities
Documentation
Learn More
Get Inspired
FAQs
Do I need an external antenna? Is it included with the product?
Yes and yes, this board has no on board antenna however a u.FL antenna is provided in the box.
Which Arducam models are compatible with the on board camera connector?
The camera adapter (J6 header) is a 20 pin adapter for Arducam cameras such as OV7675 and OV7670. For more information on how to use the camera visit the GIGA R1 WiFi Camera guide.
What is the difference between the Portenta H7 and the GIGA R1 WiFi?
The difference between these two products are:
- The GIGA R1 WiFi uses the USB-C® to power and program the board, as well as simulate an HID device such as mouse or keyboard. In the case of the Portenta H7, the USB-C® can also be used as DisplayPort out, USB Hub or to deliver power to OTG connected devices.
- The GIGA R1 WiFi exposes all the possibilities of the STM32H7 in a more accessible way using 2.54 mm pin headers making it a more suitable option for prototyping whereas the Portenta H7 is suitable for mass production since it uses high-density connectors to save space.
- Given its form factor the GIGA R1 WiFi has the space to provide additional services such as a USB-A connector, 3.5mm input-output jack and JTAG connector on board.
What shields are compatible with GIGA R1 WiFi?
Any shield with the UNO, Mega or Due form factor that supports 3.3V is supposed to work with GIGA R1 WiFi but we recommend checking with the manufacturer.
The following shields (and their libraries) are officially compatible with GIGA R1 WiFi:
- Arduino Ethernet Shield Rev2
- Arduino Motor Shield Rev3
- Arduino 4 Relays Shield
- Arduino 9 Axis Motion Shield
What is the difference between the two USB connectors?
The GIGA R1 WiFi has two USB connectors. The USB-C® connector (USB0), next to the reset button and the u.FL antenna connector, is used for programming, serial communication and 5V power. The USB-A connector (USB1), next to the 3.5mm jack connector, is used as a USB host (not a programming port).
